
So you’ve decided to start a website. Smart move.
Whether you’re building a blog, an online store, or a content business, the first thing you need is a domain name and a place to host it. And if you’re anything like most beginners, the whole process feels way more complicated than it should be.
In this article, I am not going to only show you the most affordable way ever to buy a domain and set up WordPress website; I’m going to walk you through every setup path — step by step — so you can get your WordPress site live today without the confusion.
Here’s what we’ll cover:
Option A: Buy your domain on Namecheap and host with HoganHost (our top recommendation). Most affordable
Option B: Buy your domain and host everything directly on HoganHost
Option C: Do everything on Namecheap — domain and hosting
Option D: Transfer an existing domain to HoganHost for cheaper hosting
Option E: Already have hosting elsewhere — just point your domain to a new host
Let’s get into it.
Quick Comparison: Which Option Is Right for You?
| Your Situation | Best Option |
| Starting fresh, want the cheapest setup | Option A — Namecheap domain + HoganHost |
| Want everything in one place, simple billing | Option B — Everything on HoganHost |
| Already use Namecheap and want to stay there | Option C — Everything on Namecheap |
| Paying too much for hosting elsewhere | Option D — Transfer domain to HoganHost |
| Happy with your registrar, just want cheaper hosting | Option E — Keep domain, switch hosting |
Why the Domain and Hosting Combination Matters
Before we dive in, here’s the quick version of what you’re actually buying:
- Domain name — your website’s address (e.g., yourbrand.com). You register this once a year.
- Web hosting — the server where your website’s files live. You pay for this monthly or annually.
- WordPress — the free software you install on your hosting to build and manage your website.
These are three separate things. You don’t have to buy them from the same company, which is actually an advantage — you can shop around for the best deal on each.
Option A: Buy Domain on Namecheap + Host on HoganHost (Recommended) – Most affordable
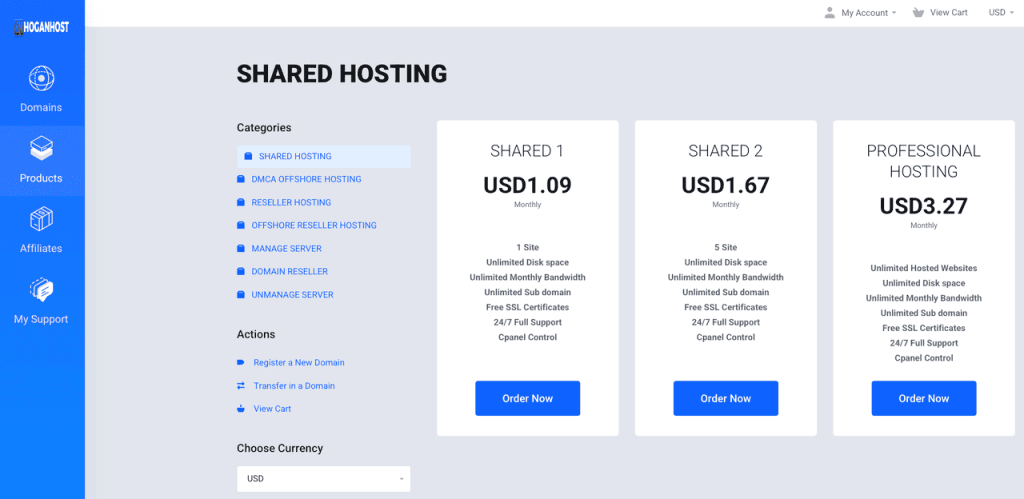
This is the setup we recommend if you want to start now without having to worry about the high cost. You get one of the cheapest domain prices in the industry from Namecheap, and rock-bottom hosting from HoganHost at just $1.09/month.
Step 1: Register Your Domain on Namecheap
- Go to namecheap.com
- Type your desired domain name into the search bar (e.g., yourbrand.com)
- If it’s available, click Add to Cart
- At checkout, apply the coupon code NEWCOM679 — this brings a .com domain down to around $7 for the first year
- Create a Namecheap account and complete your purchase
- You’ll receive a confirmation email with your login details

Step 2: Sign Up for Hosting on HoganHost
- Go to HoganHost and choose a shared hosting plan (starting at $1.09/month)
- During the signup process, select “I already have a domain”
- Enter the domain name you just registered on Namecheap
- Complete your payment
- Check your email — HoganHost will send you a welcome email containing your cPanel login URL, username, and password. Save this somewhere safe. You can also log in to your cPanel through the HoganHost dashboard.
Step 3: Point Your Namecheap Domain to HoganHost
This step tells the internet that your domain should load the website from HoganHost’s servers.
- Log into your Namecheap account and go to Domain List
- Click Manage next to your domain
- Scroll to the Nameservers section
- Switch from “Namecheap BasicDNS” to Custom DNS
- Enter the nameservers from your HoganHost welcome email or dashboard. They’ll look something like:
ns1.hoganhost.com and ns2.hoganhost.com - Click the green checkmark to save

DNS propagation takes anywhere from 15 minutes to 24 hours. Most of the time it’s under an hour. You can check propagation status at whatsmydns.net.
Step 4: Install WordPress on HoganHost
Once your domain is pointing to HoganHost, log into your cPanel(can be found easily on your HoganHost dashboard, click manage my services, and you will see Login to cPanel) and install WordPress:
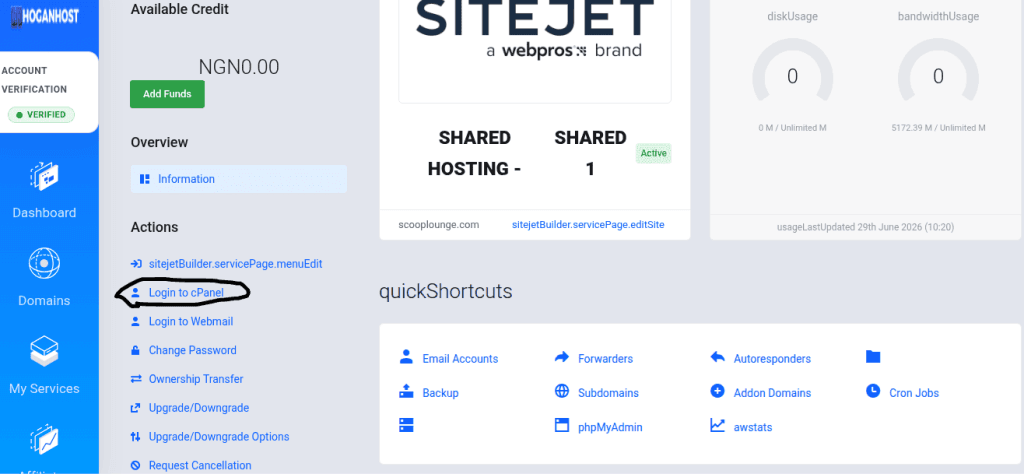
- Log into cPanel using the credentials from your HoganHost welcome email
- Scroll to the Software section and click Softaculous Apps Installer or WordPress Manager
- Click Install Now under WordPress
- Fill in the fields:
- Choose Domain: select your domain from the dropdown
- In Directory: leave this blank (unless you want WordPress in a subfolder)
- Site Name: your website or brand name
- Site Description: a brief tagline
- Admin Username: pick something other than “admin” for security
- Admin Password: use a strong password (12+ characters)
- Admin Email: your email address
- Scroll down and click Install
- Wait about 60 seconds for the installation to complete
Step 5: Log Into WordPress
- Go to yourdomain.com/wp-admin
- Enter the admin username and password you set during installation
- You’re in — your WordPress dashboard is live ✅
Total estimated cost: ~$7/year for the domain + ~$13.08/year for hosting = around $20/year to run a live WordPress website. You can also choose to pay for the hosting monthly, which can bring your total launch cost to just about $8, then $1.09 every month for the hosting subsequently.
Option B: Buy Domain and Host Everything on HoganHost
If you want to keep everything under one roof, HoganHost also lets you register your domain directly with them. It simplifies billing and support since you’re dealing with one company.
Step 1: Go to HoganHost and Choose a Hosting Plan
- Visit HoganHost
- Select a hosting plan — the entry-level plan covers most new websites
- During checkout, choose “Register a new domain”
- Search for your desired domain name and select it
- Complete your purchase — domain and hosting will be bundled into one bill
Step 2: Install WordPress
Since your domain and hosting are already connected, you can skip the nameserver step entirely.
- Log into your cPanel (available on your dashboard)
- Go to Softaculous or WordPress Manager
- Follow the same WordPress installation steps outlined in Option A, Step 4
That’s it. No nameserver changes needed.
Option C: Do Everything on Namecheap (Domain + Hosting)
Namecheap isn’t just a domain registrar — they also offer web hosting. If you prefer to keep everything in one place and already trust Namecheap, this is a valid path.
Step 1: Register Your Domain
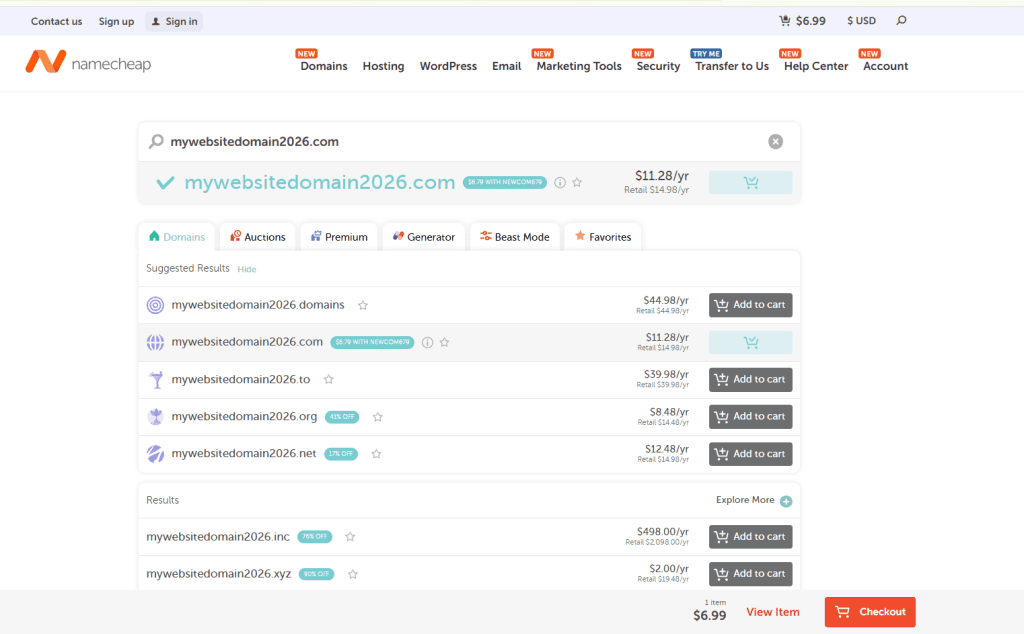
- Go to namecheap.com and search for your domain
- Add it to your cart and check out (use NEWCOM679 to get it for ~$7)
Step 2: Purchase Namecheap Hosting

- Visit Namecheap’s hosting page
- Choose the Stellar plan for a new site (starts around $1.98/month on sale)
- During checkout, select “Use a domain I own” and enter the domain you just registered
- Complete your purchase
Since the domain and hosting are both on Namecheap, they’re already linked automatically.
Step 3: Install WordPress
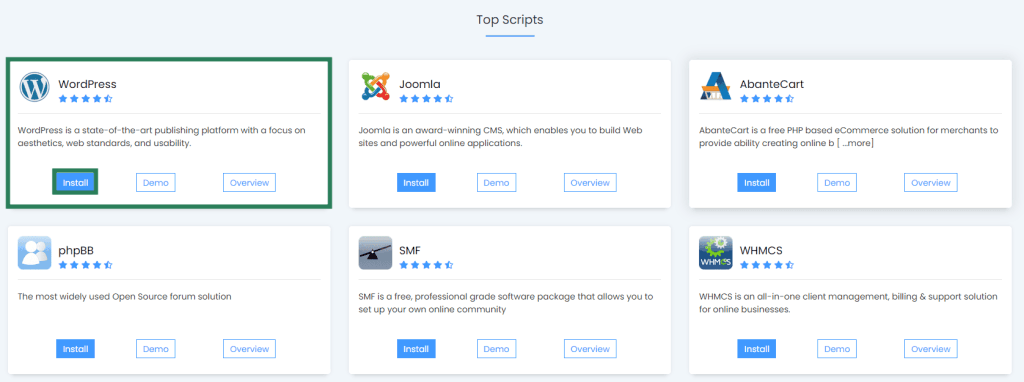
- Log into your Namecheap account and go to cPanel
- Find Softaculous Apps Installer
- Click WordPress and hit Install Now
- Fill in your site details and admin credentials
- Click Install

Step 4: Log Into WordPress
Go to yourdomain.com/wp-admin and log in with the credentials you set up. Done.
Option D: Transfer an Existing Domain to HoganHost
Already have a domain registered somewhere else — GoDaddy, Google Domains, Bluehost, wherever — and paying too much for hosting? You can transfer your domain to HoganHost and consolidate everything at a lower price.
Before you start: Domain transfers require your domain to be at least 60 days old and must be unlocked at your current registrar. Make sure your contact email is up to date — you’ll receive a transfer confirmation there.
Step 1: Unlock Your Domain at Your Current Registrar
- Log in to wherever you currently have your domain registered
- Find the Domain Settings or Domain Management section
- Look for a Domain Lock or Transfer Lock setting and turn it OFF
- Find and copy your EPP/Authorization Code (also called a transfer code or auth code) — you’ll need this in the next step
Step 2: Initiate the Transfer at HoganHost
- Go to HoganHost
- Look for the Transfer Domain option
- Enter your domain name and click Transfer
- Paste in the EPP/Auth Code from Step 1
- Complete the order — domain transfers typically cost around $8–$12, and renew your registration for one full year
Step 3: Approve the Transfer
- Check the email address associated with your domain
- You’ll receive a transfer approval email — click Approve
- The transfer process takes 5–7 days to complete
Step 4: Set Up Hosting and Install WordPress
Once the transfer is complete, follow the same WordPress installation steps from Option A (Steps 2 and 4). Your domain is already at HoganHost, so no nameserver changes are needed.
Option E: Keep Your Domain Anywhere, Just Point It to a New Host
Maybe you love your domain registrar and don’t want to move your domain. That’s fine. You can keep your domain wherever it is and just switch your hosting to HoganHost. You’ll save on hosting costs without touching your domain registration.
Step 1: Sign Up for HoganHost
- Go to HoganHost and choose a hosting plan
- During signup, select “I already have a domain”
- Enter your existing domain name and complete your purchase
- Save your cPanel credentials from the welcome email
Step 2: Update Your Nameservers
- Log in to wherever your domain is currently registered
- Find the DNS Settings or Nameservers section
- Change the nameservers to the ones provided by HoganHost (in your welcome email)
- Save the changes and wait for propagation (up to 24 hours)
Step 3: Install WordPress
Once DNS has propagated, log into your HoganHost cPanel and install WordPress using Softaculous — same as described in Option A, Step 4.
After WordPress Is Installed — What to Do Next
No matter which setup path you took, here’s what to do immediately after WordPress is installed:
1. Install a Theme
Go to Appearance → Themes → Add New and search for a free theme. We recommend Astra or GeneratePress — both are fast, lightweight, and great for beginners.
2. Install Essential Plugins
Go to Plugins → Add New and install these to start:
- LiteSpeed Cache — speeds up your site (works natively with HoganHost’s LiteSpeed servers)
- Rank Math SEO — helps you optimize your content for Google
- UpdraftPlus — automated backups
- Wordfence — security
3. Set Your Permalink Structure
Go to Settings → Permalinks and choose Post Name. This makes your URLs clean and SEO-friendly (e.g., yourdomain.com/blog-post-title instead of yourdomain.com/?p=123).
4. Connect Google Search Console
Go to Google Search Console and add your website. This lets Google know your site exists and helps you track which keywords bring in traffic. Submit your sitemap at yourdomain.com/sitemap_index.xml.
5. Connect Google Analytics
Sign up for Google Analytics and install the tracking code on your site using the Google Site Kit plugin. This shows you how many people are visiting, where they’re coming from, and what pages they’re reading.
Final Thoughts
Getting a domain and hosting set up is genuinely one of the easiest parts of building an online business — it just looks intimidating from the outside. Once you’ve done it once, you’ll wonder what you were worried about.
If you’re starting from scratch, go with Option A — Namecheap for the domain (use code NEWCOM679) and HoganHost for hosting at $1.09/month. It’s the most cost-effective combination for new websites in 2026, and the LiteSpeed hosting at HoganHost pairs perfectly with the free LiteSpeed Cache plugin for WordPress.
Any questions about your specific setup? Drop them in the comments below — we read every one.
Frequently Asked Questions
Also Read:
- How to Make Money Online With AI in 2026 — The Complete Beginner’s Guide
- How You Can Use AI to Earn Your First $ 1,000 Online in 7 Ways
- Can AI Help You Build Passive Income in 2026?
- AI Online Income vs Traditional Online Income — What’s Actually Different in 2026?
- 5 Mistakes Beginners Make Trying to Earn Online
- Best Free AI Tools to Make Money Online in 2026
- Best Free AI Tools for Writing Content in 2026
- Best Free AI Tools for Social Media Marketing in 2026
There are two kinds of people trying to build income online: Action Takers and I-Willers. The I-Willer says, “I’ll start tomorrow,” “I’ll join when I have more time,” “I’ll figure it out on my own first.”
Meanwhile, the Action Taker is already three modules deep, already making mistakes, already learning faster than the I-Willer ever will — because doing beats intending, every single time. The truth is, “I will” is just a polite way of saying “not yet,” and not yet has a way of turning into never.
The Hussle AI System isn’t for people waiting for the perfect moment — it’s for people who are done waiting. If you’re tired of being an I-Willer, this is your on-ramp to becoming an Action Taker. Join now, learn it right, and start building — today, not “someday.